How to use an Oropharyngeal (OP) Airway
Oropharyngeal (OP) airways are curved plastic devices that assist in the maintenance of an adequate airway in the unresponsive casualty. The OP airway by itself does not replace correct airway management practices and should only be considered as a tool to assist in the management of a casualty’s airway.
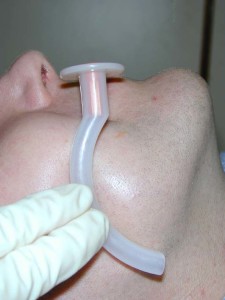
OP airways are a plastic device characterised by a rigid flange and a hollow curved tube. The OP airways have a flange (top flattened end) that, when properly inserted, rests against the casualty’s teeth. This flange does not interfere with an adequate seal from a facemask.
Inside the OP airway, and protruding slightly past the flange is a coloured bite block, which may on occasions fall out or be cracked or missing in defective airways. The bite block prevents a recovering casualty biting down hard and obstructing their airway.
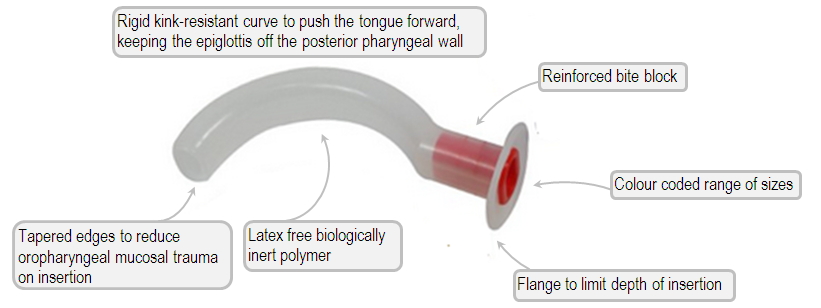
OP airways come in a range of sizes allowing for insertion into different-sized casualties. The smallest OP airways are approximately 5 cm long and the larger OP airways are over 10 cm long. The bite block also assists with size recognition as there are different colours for different sizes.
When to insert an OP airway
Oropharyngeal airways are used to help manage the airway of an unconscious casualty.
The OP airway should be inserted into the unresponsive breathing casualty’s mouth either when they are on their back (preferred position) or on their side.
Choosing the appropriate size of OP airway
To obtain the correct size OP airway, place it against the side of the casualty’s jaw line. The flange of the OP airway will extend from the centre of the casualty’s lips.
The curve of the OP airway is then laid sideways along the casualty’s jaw. The correct size OP airway is the one that closely reaches the angle of the casualty’s jaw.
Inserting an OP airway
OP airways must be inserted only into unresponsive casualties. Insertion of an OP airway into a conscious casualty may induce vomiting, gagging or aspiration and may also lead to damage or dislodgement of teeth.
An OP airway can be inserted into an adult casualty’s mouth using the rotation method:
-
Measure and choose an OP airway of the correct size
-
Remove the OP airway from the packet
-
Tilt the casualty’s head back; open the casualty’s mouth with one hand using jaw support (or jaw thrust, if necessary)
-
Hold the OP airway by the flange with the tip pointing upwards towards the roof of the casualty’s mouth
-
Insert the OP airway into the casualty’s mouth above the casualty’s tongue to approximately one-third of its length
-
While gently inserting the OP airway, rotate it 180° until the tip points downwards, at the same time sliding it over the casualty’s tongue into the back of the pharynx until the flange is touching the lips
-
If inserting an OP airway into a child or infant, DO NOT rotate the device, but gently slide it straight in
The OP airway should slip easily into place. If it is difficult, stop, re-position the casualty’s lower jaw and tongue before trying again. Never force an OP airway into position, as this may damage the casualty’s mouth, teeth, and upper airway and could cause additional airway obstruction
Removing an OP airway
Remove the OP airway immediately, if the casualty shows any signs of rejecting it. In most cases the casualty may spit it out or push it half way out with their tongue. The OP airway can be easily removed by sliding it out of the mouth following its natural curve.